DIY Craft: Finger Mitts Potholders
DIY Craft: Finger Mitts Potholders

Ever think that potholders are too bulky for carrying that hot item whether it be a mug or a casserole? Try these Finger mitt potholders!

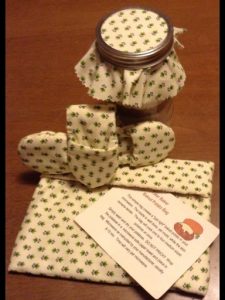
Several years ago I was given some odd shaped potholders at a wedding shower. I had no idea why they were so odd shaped. I have now come to truly appreciate the size, shape and usefulness of these finger mitt potholders. The two pockets serve to protect your thumb and a couple other fingers as you grip a hot pot or tray. These are les bulky and much easier for some children to use. You can even adjust the size of the pattern as needed. Less bulk can lend to a better grip on the hot item.

Supplies: Yes, these are the same as Tater Baker bag supplies (sans the embroidery supplies)
Warm and natural batting or 100% cotton batting
Cotton fabric
thread sewing machine (if preferred for quicker assembly)
Draft your pattern by spreading your thumb and two fingers. Mark the span (shown by dots in the picture), then draw a large oval. You can also make the “arrow” shape as seen in the picture with the blue finger mitt. This is your main piece.
Mark two inches into the pattern and copy for pocket piece.
Prepare your supplies: Cotton fabric is less likely to melt than polyester blends and is safer around heat sources. (Polyester melts and causes horrible burns. Burning, with supervision, various fabrics is an excellent science experiment for children!)
For each Finger mitt potholder:
Cut out 2 main pieces of cotton fabric.
Cut out 1 main piece of batting.
Cut out 4 pocket pieces from the cotton fabric.
Cut out 2 pocket pieces of batting.
For each pocket:
Layer 2 cotton pocket pieces right sides together with batting on top and sew the straight edge.
Flip and iron flat.
Turn right side out, enveloping the batting.
Assemble: Stack the cotton main pieces right sides together with the pocket pieces in the center, batting on top. Sew around the edges. Leave a portion open to turn the mitt right side out.
Then stitch the opening closed. If you like you may handstitch it closed or edgestitch on the machine.
Top a Brownie mix in a jar with a circle of the same fabric, make a Tater Baker bag and include these finger mitts for a great Cooking with Kids- How to series gift! Be sure to tell the recipient about the blog series.

Variations of these include adding piping around the edge or placing a magnet in the center of the batting. The latter option is wonderful for keeping the finger mitt potholders visible in the kitchen on the refrigerator!
Don’t want to make these yourself? You could try these silicone ones from Amazon.
These Finger Mitts Potholders are great for Cooking with Kids- How to Series 1, 2, 3, or 4.
Don’t forget to check out our collection of yummy and easy to make Recipes, if you have kids get them into the kitchen with our Recipes Kids Can Make!
Find out what we eat >>> Weekly MadameDeals Menu Plan

Cook, Baker, Phototaker, Fitness Mover and Shaker, Cupcake Tester, Deal Maker, Adventurous Undertaker, Do Good “Deeder”, Teacher, Mom, Wife, Patriot for Life & Giver of Good Advice – RealAdviceGal


